
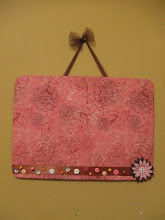
Look how cute this turned out! I think I like pink more than I thought!
I've been organizing my craft room, actually my entire house and I found tons of these wooden rulers. When I graduated, I thought I was going to apply for a teaching job, but I got engaged and plans changed. So I have been working as a substitute but I still once in a while buy things for my classroom that I will have one day. I found a wonderful deal at Target a while back and I think I only paid around .10 per ruler. So come on, .10 per ruler I had to buy a couple, maybe more than a couple; maybe a lot! I think that trip to Target, I spent around $40 dollars worth of classroom supplies. I bought notebooks, erasers, binders, pencils, rulers etc...
Well anyways, I found the rulers just now. The crafty diva in me said again, "Martha, you can create something great out of this"! So I listened like always and created this cute note holder. Its so easy and fun to make, you can make one. It may take a good hour or so to complete. I dare you to make one :)
Pictures are not the best. I let my dad borrow my camera, so I had to use my old one :(
Supplies needed:
2 rulers
5 clothespins
scrapbook paper
embellishment
(buttons, tulle, jewels, butterfly, flower)
ribbon
glue gun
scissors
spray adhesive

1. Measure the width of your ruler and cut a strip of scrapbook paper the same size.
2. Use your spray adhesive to adhere the paper to the back of the rulers. The back side is flat and will be much easier to adhere.
3. Decoupage all 5 clothespins.You can choose coordinating papers to decoupage the clothespins.
4. Choose where you want to glue the clothespins on your ruler. (I glued 3 on the top ruler and 2 on the bottom)
5. Using your glue gun, glue the clothespins on the ruler. Make sure you press the clothespin for a good5 seconds or more.
6. Cut two pieces of ribbon. These will hold the two rulers together. The ribbon I used each measured 13 inches long. You can make them shorter or longer.
7. Glue the ribbon on the sides of the rulers to hold them together. Make sure both ribbons measure the same after gluing so your note holder wont be crooked.
8. You can embellish with almost anything. I used flowers, buttons, tulle, and a pretty butterfly.
9. Add a piece of ribbon on top to hang.
10. Display in your room!
If you ever make one, please leave a comment with the link. I would love to see it!


Hola!
ReplyDeleteGracias por visitarme y dejarme tu comentario. Es verdad, tu idea es parecida, pero quedó mucho más linda! Te felicito :)
Besotes y buena semana!
Super cute!! =) Thanks for visiting my blog! Your Etsy shop is adorable too!
ReplyDeleteThis is so cute! And you look gorgeous in your dress!
ReplyDeleteSuch a cute idea and inexpensive too. Nice job.
ReplyDelete