Monday, August 2, 2010

Baby Gender Reveal Party

Have you heard about baby gender reveal parties?
There are mixed opinions about having a gender reveal party; in my opinion I think its great!
We had our gender reveal ultrasound on Friday, July 30th but really did not find out until the next day at our party. This was the most amazing and exciting party ever! I truly mean it!
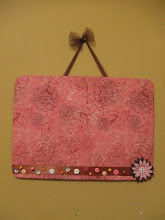
I sent out this invitation I did about 3 weeks ago.
It was a "Team Boy" - "Team Girl" theme party, pink and blue of course. Guest had to wear blue if they thought it was a boy, or pink if they thought it was a girl.
I also did a few fun games.
First, who ever brought diapers they received a ticket for a raffle of a $25 giftcard to Olive Garden. We had so many diapers at the end of the day!
Second, we hid a pink bow and a blue pacifier somewhere in the kitchen. The point of the game was for us not to tell anyone and see if anyone could spot the items while being in the kitchen. Well, it didnt work. No one ever spotted the items. So before the reveal, I just let everyone know and played. It was so much fun!
We ended not playing the third game because everyone was so anxious to find out the sex of our baby.

Here is the invitation I did.

Team Girl!


There were way more people in Team Boy!

I used pink and blue decorations for the party. I mainly bought streamers and balloons! Inexpensive and cute! I started buying party stuff about a month ago. Anything that was blue or pink and would work for the party I would buy.


Never forget the veggies! This was the first plate of food gone!
All the food had cute tags that were made with scrapbook paper and a stamp. So easy and they turned out so cute.


A good friend of mine made these cute pink and blue rice krispies pops. They were a hit!

In one corner of my kitchen I had all the drinks. I had sodas, water bottles, pink lemonade and blue hawaiian punch.

I bought these adorable unbreakable drink jugs at Sams Club. They were a hit! I did have trouble finding a blue drink.


I used the same paper as the food tags to make these watter bottle labels. They were so easy to make and looked so cute!

Here is my sister cutting the sub right before guest arrived. By the way, out of all the 40 guest we had (including kids) my sister was the only one who knew what I was having. She did the cupcakes! She was dying for everyone else to know! She did a great job keeping the secret!

Some of my friends who came to the party.
4 out of my 7 best friends are pregnant including myself. Isnt that crazy?

The 3 pregnant ladies!


Here I am with my mom (pink dress) and our good friend Delia.

My husband and I before the reveal. So excited!!

Here I am before the reveal doing the raffle and playing the games. Everyone was so anxious.

Here are the cupcakes and toppers my sister made. They turned out so cute and delicious!
So we had all guest wait until I counted to three to take a bite out of the cupcake and see if we found a blue m&m, or a pink.
I found a blue m&m inside.
IT'S A BOY!!!!!!!
This was so much fun!!! Everyone was excited and had so much fun!
We cant wait to meet our baby, Isaac.

These are all the diapers and gifts we received.
Everything turned out great and we had so much fun.
Hope you enjoyed our party!


Wednesday, July 14, 2010

Vintage/Modern photo canvas project.. So cute!!

It feels so good to create projects again!
I am oficially in my second trimester and happy! Let me just tell you the first three months....WOW... I was seriously in bed all day; tired, sleepy, cramps, sick... whew... glad Im over that! I did not have strength to create anything! I really didn't feel like doing anything but sleep! If you've been pregnant, did you ever feel like this? or did it just happen to me?
So im 4 months and 2 days! :) but whos counting really.. ha...ha.. So weird, my belly popped out exactly at 4 months. One day, I just woke up and saw my belly! I love this new experience that Im going through and cant wait to meet my baby.
Anyways, I wanted to share this super cute canvas project I finished today. It does take a while to complete but worth it! I love the vintage/modern look of it.
I made this project using an 8 X 10 canvas and a picture of my niece I took of her on Easter. I made it using a cool transfer technique using mod podge. I absolutely love how it turned out. I must say, its a little messy but the results are wonderful.
I used a wash-out technique to give it an antique look which I love. To give it a modern look I used some swirl designs, pink crystals and tulle bow!
I really love they way it turned out so I might be making a few more.
Enjoy the pictures of my project!
Also, visit my shop and check out new items Ive listed!


Thursday, July 1, 2010

Day of Blog Silence for Baby Cohen

Thinking of Megan and Brent who are holding the memorial service for their baby boy Cohen today.

Tuesday, May 4, 2010

Cute Mother's Day Gift Idea

I made these cute birth announcement photo blocks for my sister. This will be her Mother's Day gift from her daughter, Yuliana. (21 months old) I think they turned out so cute!
This project is made using 2 X 4's bought at Home Depot.
I am now working on a blue and brown set from her son, Johan. (4 months old) I will post pictures soon!
I have an announcement to make..... drumroll pleaseeeee.....
I AM PREGNANT! I thought I shared the good news! I am 6 weeks and couldn't be happier! I cant wait to meet our baby and make a lot of cute stuff.
Have a great day!
Visit my shop:


Thursday, April 15, 2010

Bright and Fun Teacher Gift

This is a custom order I did for a lady who is student teaching and wanted a cute bright sign for her mentor teacher. She said bright and really it doesnt get brigther than this! ha.. I think it turned out so cute! I used swarovski crystals on the flower rosettes and a touch of tulle!


I have them on sale for $25 plus shipping if anyone is interested. (Until April 18th, 2010) I can make them any colors! Visit my shop and check out other teacher gifts I've made.


Here is a different style I have done for a teacher.

Monday, April 5, 2010

Charger Transformation - For the love of turquoise!

Good morning! Hope you had a great Easter Sunday! We sure did!
As you know, I'm in the process of adding more turquoise into my living room. I am challenging my self to decorate with things I all ready have. Today I share with you an easy project that makes a big change.
The power of spray paint is great! I love spray paint.
I've had this beautiful charger for over a year now. I bought it at Kirklands, one of my favorite stores. Its got to the point where its a little boring now. It needed a makeover! So it got one today!
First, I cleaned it well with a damp cloth.
Then, I spray painted a turquoise color. Spray light coats to get a better result.


Next, I watered down brown paint and used it as a glaze.
Wipe down paint after 10 seconds or so. Its a quick process.
After it dried, I used normal acrylic paint to bring out the 3-D embellishment.

This is the final result! I love it! Looks like a new charger! Its always a great idea to use things that you all ready have and give them new life! This project was free since I all ready had all the materials! Its looking great in my living room!
Thanks for visiting! Hope you enjoyed this easy tutorial!


Thursday, April 1, 2010

Super easy and cute flower headbands

I am in love with all the girly girl hair accesories! Love them! Especially flowers!
I started making these flower headbands for my niece and guess what? I fell in love with them and kept them! ha... Dont worry, I will be making more for her! This is a super easy project that anyone can do.
Materials needed:
Glue gun
Flower
Braided elastic
Tulle (optional)
Scissors
Felt

1. Separate your flower.

2. Cut 2 circles out of felt. (1 1/2in. diameter) Size of circle depends on size of flower.
Glue the first layer of flower on top of the felt circle.

3. Continue gluing the flower pieces together.
4. When finished gluing the flower, I added glue to the center of flower and used beads to decorate. You can also use swarovski crystals, ribbon, buttons etc...
5. I added hot pink and black tulle to the bottom of the flower.

6. Cut a piece of elastic (around 18 - 20 inches) I dont like it to tight thats why I cut the elastic a little longer.
7. Glue the ends of the elastic together. Using the 2nd piece of felt glue the elastic and the flower on top.
This is how the final project turned out!
I am loving the messy hair style! It looks so cute with the flowers! I'll be styling one of these tomorrow!
Hope you have enjoyed this easy tutorial! If you make any, I would love to see pictures!