Friday, July 17, 2009

Flower McLinky Party

As I promised here is the Flower McLinky Party! I want to see what you have created. I love flowers and I use them a lot in my work. I have used paper flowers, fabric flowers, plastic flowers, silk flowers, bead flowers and more!

Today I want to show you how easy it is to create this paper wrinkled flowers. Really, so easy!

Materials:

Scrapbook paper
Scissors
Ink Pad
Marker
Glue
Embellishment ( I used a button you can use anything)


1. Cut 3 circles out of the scrapbook paper. You need to cut a big one, medium and a small circle.


2. Scrunch up the circles really good. The more wrinkled they are, the better. If they rip from the side, thats ok. They look better like that.


3. Using your ink pad, lightly rub around the circle and in the center. It gives it an awesome look.


4. Now using your permanent marker, draw a line around the circle. Make sure its not to close to the edge.


5. Glue all three pieces together.


6. Embellish the center of the paper flower. I used a button but you can use glitter, rhinestones, ribbon etc...


Final step is to add the flower to your artwork.


I finally finished this collage. I have been wanting to make a funky collage for ever. I finally did. I created this pop art print to use in my collage. I really had no idea how I was going to do it. Everything came together the moment I stood in front of a blank piece of wood. Its a picture of my niece when she was about 7 months old. Its going to look perfect in my craft room. I am liking this idea of making funky collages. Its really fun. I will be adding this piece to my Etsy shop soon. Its beautiful!

Now its your turn to show everyone your flower creations. Rules are simple. Add your link to McLinky showing what you have done that involves making a flower. It could be a paper flower ( like the one I did), ribbon flowers, fabric flowers anything that has to do with flowers. Even if you decorated something with flowers. I cant wait to see your creations.


Thursday, July 16, 2009

Birthday Cake Table Idea

Kelly @ Kelly's Korner is having a Children's Parties - Party ( If it makes sense ha..) You know I have no children yet and I've never really planned a kids party. I do have some great ideas! Actually, my niece will be turning 1 in August and I've been planning little by little but I still have nothing to show. She will be having a Tinkerbell party! I am excited!

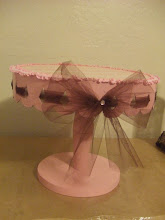
I do have something to show that I made today that would be great to decorate a cake or candy table. I made one that says Happy B-day. It turned out great! Another great idea would be to decorate a table with the birthday boy or girls name. Each letter holds a picture. So for my niece I am thinking of putting one picture for each month. Wouldn't that look nice? They can be done any colors any style. I will be adding these to my Etsy Shop soon.

They do take some time to make since you have to hand cut the base, sand, prime, paint, decoupage and embellish! What do you think? Good idea? Im thinking of adding ribbon and tulle to make it look cuter!


Another great thing to have at parties for decoration are these huge pom-poms! They look wonderful. You can make them any colors, any size. Here is a great tutorial if you are interested in learning how to make them. I made the ones shown in the picture for Mother's Day.

POM-POM Tutorial


I think a candy buffet would look great! I especially love this candy buffet because of all the beautiful colors. Doesn't it look great!


Those are some of the ideas I have for a children's party. Hope you have enjoyed them.

Image Source

Wednesday, July 15, 2009

In Rememberance of Stacey @ The Thrifty Chick

I just found out that Stacey Wolfley @ The Thrifty Chick suddenly passed away on Monday July 13th, 2009 due to a stroke. I have never met Stacey in real life but I was a follower of her wonderful blog. Two weeks ago, she had her beautiful baby boy. She had 4 children. My heart is aching for the family.

Please keep her family in your thoughts and prayers and if you can, please leave a comment for the family.

Friday, July 3, 2009

Flower Clip Tutorial and a Party!

I've been home too long! I had my follow up appointment yesterday, I am getting better. :)

For the longest time I had been wanting to try a ribbon flower for my hair. I finally did! It is super easy. It might take a longer time if you don't have a sewing machine, eh, but it wont kill you! I love flowers. Silk flowers, ribbon flowers, bead flowers, plastic flowers, paper flowers you name it! So I want to try this flower party for next week. I hope you participate!

You have one week to create any craft, project, card anything you'd like with a flower theme. It needs to somehow have a flower. You can create a box with a flower, a greeting card with a flower, a flower necklace, a purse with a flower, a tissue flower anything that has a flower counts! I cant wait to see all the great projects!

Here is the flower tutorial:

Materials needed:
Fabric ( 44 in strip - 1 1/4 wide)
Thread
Needle
Clear Glass Flat Marble
Paper
Felt
Alligator Clip

1. Cut a strip of fabric. 44inches long- about 1 1/4 wide.
2. Stitch along the very edge completely on one side.


3. Once you have completed stitching, slowly pull the thread and the ribbon will begin pleating forming your flower.
4. Start forming your flower and stitching in place.


5. Glue a flat marble bead to paper and let it dry. After it dries, cut out around the bead.


6. Glue the clear marble to the center of your flower.


7. Glue a piece of felt and alligator clip to the back of the flower. Enjoy!


You can wear as a brooch.


I love how it looks in my hair! Hope you have enjoyed this tutorial! Very easy to do. Now its your turn to create a project with a flower and share next week!


Monday, June 29, 2009

12 X 12 Monogram Wall Art

I've been home all day. I dont even want to go out! Next Thursday I have my doctors appointment. :)

I created a new monogram wall art today. I loved how they turned out! They look much better in person. I need to practice taking better pictures!

I have them on sale for only $16 + shipping. They measure 12 X 12. Tomorrow I will make a few more a little different.

Its almost 4 of July and I am curious, what do you usually do on 4th of July? We usually travel during this time, but not this year. I would love for you to share ideas of what to do this 4th!

Goodnight

Friday, June 26, 2009

Show us where you live Friday- Master Bedroom

It feels weird posting after so long. Ive been sick. Really sick. Remember I told you I was diagnosed with pleurisy? Well from pleurisy it went to early pneumonia & bronchitis... I am taking really STRONG medication all this week and using my neubelizer 4 times a day. I just want to get better. I don't smoke, I don't drink, I am eating healthy and exercising several times a week. I have faith that by the end of this week I will be the same ol' me! :) I miss doing my crafts and projects! I have a feeling SoLovelyCreations will be coming back soon with many projects! Thanks to everyone for your prayers and comments. They really do make me feel better!

We did take a trip to Rosarito last weekend. It was fun, but half of the time I was sick. :( More pictures on our Family Blog. Theres me!


So I am joining "Show us where you live Friday" from Kellys Korner. I missed last week which was laundry room. You all have seen my laundry room but here it is again! I am planning to change a few things. I will let you know.

BEFORE

AFTER


Welcome to our Master Bedroom.


These are some of the pictures we took from our 1 year anniversary. I had a few blank spaces and decided to decorate with scrapbook paper. You never go wrong with scrapbook paper. I love how it turned out!


Here is the entrance to our bedroom. I really do feel like a queen in this room. I feel very calm and relaxed when I am in my room.

Four poster bed! Yeahhhh.. I love it! I've always wanted a four poster bed. It looks so elegant and different. The colors look perfect!

This is a BEFORE picture:

AFTER:
I dont have the T.V there anymore. I decided to go with a seating area. Next Picture.

I needed to incorporate my 105 year old books in our room. Aren't they lovely? I bought a set of 13 books.


One of my favorite photos we took for our 1st year anniversary! Its so Vogue! ha..


BEFORE:


AFTER:


I am in love with my curtains! It reminds me of Beauty and the Beast. Belles dress?!!


FREEBIE

I almost forgot. Gliden is giving a way a free quart of paint. All you have to do is go here, choose color, fill out your information and you are done! Happy Painting! I choose cinnamon spice. So pretty.

I hope you have enjoyed looking at the pictures. If you have any ideas, comments, suggestions anything please let me know! I'd love to know what you think!

I told you I was going to share some pictures we took for our anniversary, so here you go! Enjoy!