Thursday, April 30, 2009

Really..... $1 floor lamp???

You are not going to believe this! I went to Kirkland's earlier today looking for a floor lamp for the seating area in our room. Remember I told you I didn't want the T.V in our room and instead I wanted a seating area? Well its coming a long great! The floor lamps are beautiful at Kirkland's but the prices are not right for me at these moments. I was hoping to find a good deal, but the deal was not there. I was a little disappointed but I knew I would find something quick.

Oh boy oh boy... did it come quick! I took a trip to the Goodwill store and look what I found! This not so beautiful lamp with a lot of potential. I immediately thought " I could paint it, and cover the lamp shade with a pretty fabric etc... In matter of seconds I had everything planned out how I wanted it. So I check the price, and guess what.... the price was right! It was originally $7.99 / Week 14 tag. Today all week 14 tags were .99 cents! I quickly put it in the shopping cart. My husband was laughing at how funny it looked "driving" a shopping cart with a 5 1/2 tall lamp! ha.. I laughed at myself too!


I also found this pretty fabric (1 1/2 yd) for 1.99. It is beautiful!

How to cover lampshade:

I measured the lampshade and cut the fabric according to size.
I used spray adhesive (it works great)
I adhered the fabric to the lampshade and smoothed it out as much as I could. The fabric is kind of wrinkly!
I hot glued the fabric to the top and bottom of the lampshade.. and shazammm.. I had a beautiful elegant lampshade.

Its very simple! You should try it!


I took the lamp outside and gave it a little makeover with spray paint! I love spray paint! I choose "Espresso" color. Its like a rich chocolate color.


The middle part of the lamp started bubbling and I did not like how it was turning out as it dried. So I cut a long strip of the same fabric as the lampshade and glued it down.


Here is a close up of the lampshade. Isn't it beautiful? I love it!


Here is the final piece! So.. what do you think? Its amazing that spray paint and fabric can do so much! It looks like a brand new lamp!


I am still not done with the seating area but I just couldn't wait to show you how great it is looking.
Thanks for visiting! You are more than welcome to leave comments!
Thanks!

Tuesday, April 28, 2009

Our new master bedroom....

I know.. I took a long break.. I really needed this break. There was just so much going on, I needed some time off. I'm glad I am back!

Well this weekend we finally bought our bedroom set. I am so happy! Don't get me wrong. I love my round bed, but our master bedroom wasn't complete. I needed a change. Our round bed is in our guest bedroom now. Next project, decorating our guest bedroom! :)

I bought a beautiful frame for our 1 year anniversary pictures. It was perfect for all of our pictures. I decided to place the frame on the wall before entering our bedroom. I think it looks beautiful. I do need more decoration though!


I had a few blank spots and decided to decorate with scrapbook paper. You never go wrong with scrapbook paper. I love how it turned out!


Here is the entrance to our bedroom. I really do feel like a queen in this room. I feel very calm and relaxed when I am in my room.

Four poster bed! Yeahhhh.. I love it! I've always wanted a four poster bed. It looks so elegant and different. The colors look perfect! Two things I will be working on this weekend: buying pillows ( I love pillows) and adding a nice seating area in place of t.v.


My nightstand! haha.. I am still working on decoration. What do you think about decor? Too simple? Too much?


I needed to incorporate my 105 year old books in our room. Aren't they lovely? I bought a set of 13 books.


One of my favorite photos we took for our 1st year anniversary! Its so Vogue! ha..


I am in love with my curtains! It reminds me of Beauty and the Beast. Belles dress?!!


This is the area I will be working on this weekend. I dont like having a t.v in our room. I would love to have a reading area with a nice floor lamp and baskets with books. I think I have the perfect chair for this area.


I hope you have enjoyed looking at the pictures. If you have any ideas, comments, suggestions anything please let me know! I'd love to know what you think!

I told you I was going to share some pictures we took for our anniversary, so here you go! Enjoy!


Thursday, April 16, 2009

Unique Candle Holder

I absolutely love candle holders! Especially pillar candle holders. I have many around the house and they look lovely.

I found this website where they sell beautiful home decor. I love it! The problem is, its a little expensive. Would you pay $150 - $400 for a set of candle holders? I don't know about you but I certainly cant!

I tried a little experiment of making my own candle holder and guess what? I loved it! Scroll down to read more. :)


So here is the candle holder I made. I wanted to use items I had at home, but too bad for me I couldn't find anything. I had to go to the store and buy some items. By looking at the picture, can you guess what its made out of? Could you?


Call me crazy but I made this out of coffee beans, Lima beans, Styrofoam and a thick plastic plate! It turned out so cute! I have all ready placed it on my entry way table and dining table to see how it looks; it looks fabulous! You really cant even tell what its made out of! It looks just as great as an expensive store bought candle holder. I am thinking of making some more candle holders (different heights) to decorate my entryway table! Pictures coming soon!

Mmmm.. wake up and smell the coffee! It really does smell great! Hazelnut.. yummy!


Testing, testing... 1 , 2... haha.. just giving myself an idea of how great they will look on my dining table.


Testing on my entryway table.


Here is a close up of the candle holder. If you want a unique handmade decor, you gotta try this! I dare you to try it! So simple, inexpensive and beautiful! Please share pictures if you decide to try this! :)
Take Care!
Martha

Thursday, April 9, 2009

Easter Ideas

Hello! I'm back! It was nice taking some time off. These past 2 weeks have been very difficult for our family. I've cried so much. I just let everything out. It helps and makes me feel better. I want to thank everyone for sending email's and leaving comments. I appreciate it!

Well Easter is just in a couple of days! Here are some really cute easter ideas. If you would like to share any ideas, please leave them in a comment!

Rice Krispie Treats (Bird Nest)

Patty @ ModKid did these rice krispie treats in shape of a bird nests. She used Whoppers Mini Robins Eggs as the baby eggs. I love this idea! I might have to try this.


Jeanne @ JeanneWinters created this Jesus Easter egg project. Jeanne has a great tutorial on how to create this project. She used cranberry juice, spinach and blueberries to dye the eggs.


I found this great project here on how to create this great gumdrop topiary. This would look great as a center piece on any table!


Cindy @ This is my Life teaches how to create this beautiful Easter wreath. I love the colors on this wreath! It turned out beautiful!


Look how cute these Easter Bunny S'mores are? You can find ingredients and directions here.
I hope you liked these ideas! :)

Friday, April 3, 2009

Visit to the E.R.

I went to the E.R. last night. It was scary. Read more about it here.

I will be away this weekend. I have many things I want to share. I will share some projects when I come back!

Thursday, April 2, 2009

Just a little something....

I'm exhausted. The last two days we have spent it mostly at the hospital. Valerie had her c-section yesterday. It was tough for her and the rest of the family. She did get a little panic attack before going to the operating room and they needed to calm her down. Everything went well. We had the chance to keep the baby for one day. He was handsome! I wanted to share this picture that I took yesterday. This is Valerie holding her son's hand. He weighed 3 lbs. 11 oz. -- 16 inches. He was so beautiful. I will never forget his little face. I love him so much! Please keep praying for Valerie and her family. We will be going to the hospital tonight to spend some time with Valerie and her family.


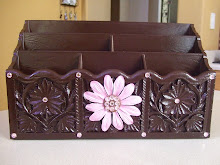
I wanted to share this cute project I did a while back. This is my pencil holder I have next to my computer. It turned out so cute. Again, you cant go wrong with pink and brown!


This is the hair bow holder I did for Stacey. She won my "Hair Bow Holder Giveaway". The colors she choose are awesome! I love the color combination. I was glad I had the perfect ribbon to match the bow holder! Its so cute!


Several weekends ago we found these beautiful items at a yard sale.

This first item we bought it for only $5! Yep, 5 buckaroos! The family we bought it from used it to hang coats. As you can see in the second picture, the back board had hangers.

Now let me tell you the story how it fell apart. We kept this beautiful piece in our backyard since I still needed to paint. This afternoon I walk outside to take some nice pictures to post and what do you know; my beautiful piece laying on the ground, the backboard laying next to it broken and the glass door, all shattered! Last week was really windy! So windy, it knocked this piece straight to the ground! Good thing that its still ok. I will have to figure out how to fix it. What do you think about this piece? Im thinking of making it into a giant jewelry organizer! haha.. I have that much jewelry!


We bought this beautiful metal art for $2. Its beautiful! I loved it! Today my husband and I, hung this metal art in our bedroom!


What do you think? You cant really tell, but it looks much better in person. This little trick made the ceilings look higher. It looks awesome! Our master bedroom is coming along beautiful!


We bought these for $5. I still don't know where to place them! I'm thinking placing these on the sides of our mirror in our bedroom. I guess we will see how it works out.
Well, I hope you've enjoyed todays post. Thank you so much for visiting!